Because of the live ISO installed it was unable to detect the network device and we are not able configure the network device.
Solution to this issue we open the /etc/network/interfaces file do the changes follows
auto eth0
allow-hotplug eth0
#iface eth0 inet dhcp //modified this one
iface eth0 inet static //modified this one
ipaddress xxx.xxx.xxx.xxx
netmask xxx.xxx.xxx.xxx
gateway xxx.xxx.xxx.xxx
then restart the network service by type it in command line
sudo /etc/init.d/networking restart
Then Network device is configured sucessfully.
Thursday, December 22, 2011


Thursday, December 8, 2011
HP LaserJet Printer Configuration in BOSS (GNU/Linux)
This process will common for all HP Printers like HP LJ P 1007, P1020,P1020 plus,1022,3050 MFP, M 5035 MFP,P 2015N and Configuring the HP Fax device,for Fax Number needed.
1.To configure the HP Laser Jet 1020 open the terminal and type the following
sudo apt-get install hp-setup -i
“i” denotes setup process with interactive mode
This setup need the internet connection to download the appropraite plugins.
Other wise download the appropriate plugin.
2.

In this step choose the printer connection type one of the following
0 usb
1 net network printer
2 par parallel port(LPT)
After entering the type as usb then input is '0'
3.

Then this idenify the device connected USB Port and begin to install the plugin by asking
d download from interner
p specify the path
q quit the hp-setup
input is d then it will start the download and proceeds the installation process
4.

Installation is starts with license agreement page to install agree the terms and conditions otherwise cancel if do not wish to agree and quit the installation.
5.

Then asking the name for the print queue with the 3 Options
m=use model name: “Hp_Laser-jet 1020”
q=quit
Choose the m to name the print queue.
6.Then it will find the respective ppd file name and it will ask whether the name appeared ppd file is the correct one with 3 options
y=yes
n=no
q=quit
7.Then installation ask you want enter the additional information or notes for this printer
with q=quit option.
Then it will the add the print queue to CUPS.
8.

installation process asks whether you want print the test page with 3 options
y=yes
n=no
q=quit
if yes test page is send to print.
Thursday, November 17, 2011
MTS MBlaze USB Data Card In BOSS 4.0(GNU/Linux)
1.Insert the USB MTS Mblaze Data Card
2.Then Open the terminal and type 'wvdialconf' to get the configuration details about the connected modem.
 3.Then open the wvdial.conf in the path /etc/wvdial.conf and update the configuration file
by updating the Phone ,Username and Password fields only like the following
Before Editing the Configuration File :
[Dialer Defaults]
Init1 = ATZ
Init2 = ATQ0 V1 E1 S0=0 &C1 &D2 +FCLASS=0
Modem Type = Analog Modem
ISDN = 0
New PPPD = yes
Modem = /dev/ttyUSB0
Baud = 9600
Phone =
Username =
Password =
After Editing the Configuration File :
 [Dialer Defaults]
Init1 = ATZ
Init2 = ATQ0 V1 E1 S0=0 &C1 &D2 +FCLASS=0
Modem Type = Analog Modem
ISDN = 0
New PPPD = yes
Modem = /dev/ttyUSB0
Baud = 9600
Phone = #777
Username = internet@internet.mtsindia.in
Password = mts
4.Then type the following command in terminal wvdial

5.Now MTS Modem Connected and get IP Address and DNS Server Addresses automatically .
2.Then Open the terminal and type 'wvdialconf' to get the configuration details about the connected modem.

by updating the Phone ,Username and Password fields only like the following
Before Editing the Configuration File :
[Dialer Defaults]
Init1 = ATZ
Init2 = ATQ0 V1 E1 S0=0 &C1 &D2 +FCLASS=0
Modem Type = Analog Modem
ISDN = 0
New PPPD = yes
Modem = /dev/ttyUSB0
Baud = 9600
Phone =
Username =
Password =
After Editing the Configuration File :

Init1 = ATZ
Init2 = ATQ0 V1 E1 S0=0 &C1 &D2 +FCLASS=0
Modem Type = Analog Modem
ISDN = 0
New PPPD = yes
Modem = /dev/ttyUSB0
Baud = 9600
Phone = #777
Username = internet@internet.mtsindia.in
Password = mts
4.Then type the following command in terminal wvdial

5.Now MTS Modem Connected and get IP Address and DNS Server Addresses automatically .
Tuesday, September 27, 2011
Tamil KeyBoard Issue in BOSS 4.0 and Ubuntu Developed by Tamil Virtual Academy
After installing the keyman 3.2
click the TN Keyboard Interface in the Applications Menu.
Opening the text editor type
if the tamil fonts are coming, the Scroll lock or Num Lock not enabled
else
the Scroll lock or Num Lock is enabled in order to get tamil fonts disable the Num and Scroll Locks
click the TN Keyboard Interface in the Applications Menu.
Opening the text editor type
if the tamil fonts are coming, the Scroll lock or Num Lock not enabled
else
the Scroll lock or Num Lock is enabled in order to get tamil fonts disable the Num and Scroll Locks
Tuesday, September 13, 2011
Solution for Video Driver Problem BOSS GNU/Linux
When Playing a video file from BOSS some times it will play audio for couple of seconds and it will stopped and the system is hanged.
You cant proceed any other work for this you should do following:
Open the terminal window
Type gstreamer-properties and Enter
following window will open

Click the video tab change autodetect option to a specific driver to work the video device driver.
In BOSS Linux Compaq Presario CQ43 Model you shoud choose the option
X Window System (No Xv)
Its shown following figure

You cant proceed any other work for this you should do following:
Open the terminal window
Type gstreamer-properties and Enter
following window will open

Click the video tab change autodetect option to a specific driver to work the video device driver.
In BOSS Linux Compaq Presario CQ43 Model you shoud choose the option
X Window System (No Xv)
Its shown following figure

After that checking whether its working click test option.


Wednesday, September 7, 2011
Evolution Mail Client Configuration
Evolution
Mail Client Configuration Manual
Step 1:
Open the Evolution Application
Applications → Internet → Evolution

Then Click 'Forward'
Step 2:

If you have already evolution mail
client backup file then select option 'Restore Evolution from the
backup file'
and choose
loaction of the file
otherwise
click the option 'Forward'
Step 3:
Record your
identity by entering your name and email address in the respective
fields.
Then
click 'Forward'.

Step 4:

For
reading and storing mail on IMAP Servers choose Server Type
is IMAP
For
reading and storing mail on POP Servers choose Server Type
is POP
configuration
option fill server
field imap.gmail.com
and username is
toaster.testing
If
the user want to use the secure connection
select the security option either TLS
or SSL
Authentication Type is by
default password
after
filling necessary fields click 'Forward'
Step 5:
In the receiving
options used for customize your settings to receive messages from
server.
User can choose
their own.
after
filling necessary fields click 'Forward'

Step 6:

To
Sending the mails to other recipients choose the Server
Type as SMTP
In
Server Configuration fill
smtp.gmail.com
choose
secure connection establishing using TLS
or SSL encryption
standard
In
Authentication type is PLAIN
username(email-id) of the user.
after
filling necessary fields click 'Forward'
Step 7:

Evolution Mail
Client have each mail address one configuration account.
That Describe or
identify the particular user account to view the messages .
Fill the Name
field like work or personal or the user wish.
After
filling necessary fields click 'Forward'
Step 8:
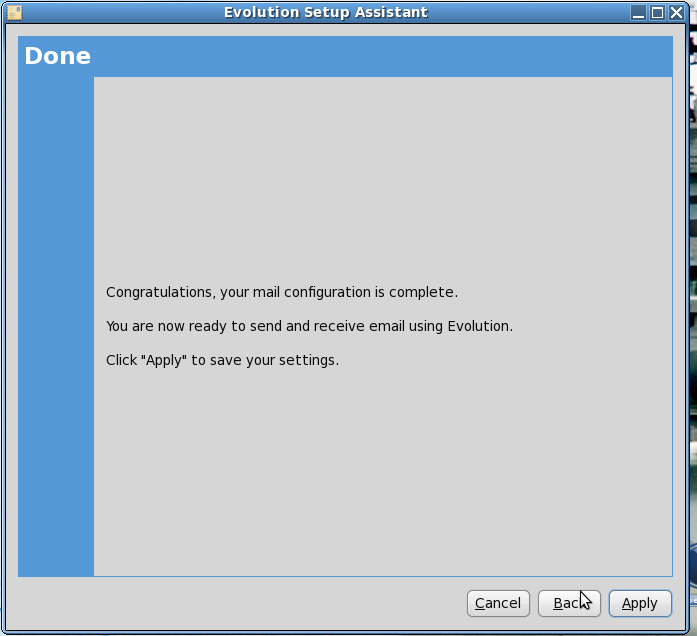
After
all the configuration settings done click 'Apply'
to save the settings and retrive the user mails from the mail server.
Screen Shots of Configured Mail
Address
Personal
is the currently configured account for toaster.testing
account. once click the personal account folders click Send
/Receive message option in the
tool bar.after clicking it will ask for password of toaster.testing
account .If the password is accepted it starts downloading messages
from the server.


In
Above Screenshot shows downloaded INBOX emails or messages
from the mail server

In
Above Screenshot shows downloaded ILUGC emails or messages
from the mail server
Sending
Mails

To
send a message or e-mail click new in the tool bar
(or)
message
→ compose new message(Shft+Ctrl+M
this
shown above screen shot
after
composing a new message it will go to outbox.
Now
Click Send / Receive
option in the menu bar to send the messages ,at the same any new
messages arrived in mail server also downloaded locally.

Above
screen shot shows the receipent received the mail.
Thursday, July 14, 2011
Wubi Ubuntu Installer -Ubuntu Installed on Windows as like Application
Wubi installer available in Mac,Windows XP/Vista.
for detail kindly visit this link https://wiki.ubuntu.com/WubiGuide
to download latest source code for wubi first install bazaar in your system
after installing type the following in your system
bzr branch lp:wubi
for detail kindly visit this link https://wiki.ubuntu.com/WubiGuide
to download latest source code for wubi first install bazaar in your system
after installing type the following in your system
bzr branch lp:wubi
Subscribe to:
Posts (Atom)
-
 This process will common for all HP Printers like HP LJ P 1007, P1020,P1020 plus,1022,3050 MFP, M 5035 MFP,P 2015N and Configuring the HP ...
 -
.Open the System -> Printing -> add 2.Then Select the Printer Connected to Parallel Port or Detected Printer name is TVS MSP 455XL...
-
Step:1 sudo apt-get install python-pip Step:2 pip install -U selenium for python3 and more install Step:1 sudo apt-get...