Thursday, November 15, 2012
How to install Microsoft Fonts in BOSS 5.0
1.Open the terminal accessories -> terminal
2.Type the following command
sudo apt-get install ttf-mscorefonts-installer
3.Configured sucessully
Wednesday, October 3, 2012
ASUS USB -N10 Wireless Ethernet Adapter Configuration in BOSS 4.0
1.Insert the USB Card to System.
2.Install realtek driver from repository using following command
sudo apt-get install firmware-realtek
3.After Installing restart the system.
4.Then Click the network icon in the Task Pane or Task Bar.It will shows all the wireless networks.then click one of them to get access.
5.This was successfully Configured.
Tata Photon Plus Error - Solution to Configure the Tata Photon Plus in BOSS 5.0 and 4.0
1.Insert the USB Photon Plus Data Card
2.Then Open the terminal and type 'wvdialconf' to get the configuration details about the connected modem.
3.Then open the wvdial.conf in the path /etc/wvdial.conf and update the configuration file
by updating the Phone ,Username and Password fields only like the following
Before Editing the Configuration File :
[Dialer Defaults]
Init1 = ATZ
Init2 = ATQ0 V1 E1 S0=0 &C1 &D2 +FCLASS=0
Modem Type = Analog Modem
ISDN = 0
New PPPD = yes
Modem = /dev/ttyUSB0
Baud = 9600
Phone =
Username =
Password =
After Editing the Configuration File :
[Dialer Defaults]
Init1 = ATZ
Init2 = ATQ0 V1 E1 S0=0 &C1 &D2 +FCLASS=0
Modem Type = Analog Modem
ISDN = 0
New PPPD = yes
Modem = /dev/ttyUSB0
Baud = 9600
Phone = #777
Username = internet
Password = internet
4.Then type the following command in terminal wvdial
5.Now TATA Photon Plus Connected and get IP Address and DNS Server Addresses automatically .
Thursday, September 20, 2012
Ricoh Afcio MP 2000 Printer not printing and Printing Blank Pages in BOSS 5.0
Issue:
When installing BOSS Ricoh Afcio MP 2000 Printer not
printing the the test page or not printing the document also
printing multiple pages with out the content(Blank).
Solution:
1.Go and Click the Applications →
system tools → Administration ->Printing option.
2.Then Click change Option in the Make
and Model.
3.It will go for the searching for new
drivers and it will show options to configure
Select Option “select printer from
data base “
4.Select “Ricoh” as printer
manufacturer and Click go forward .
5.From list of printer models select
“Afcio MP 2000”
6.Select Ricoh Afcio MP 2000 -CUPS +
Gutenprint V.5.2.6 [en].
7.Then Click forward ,It will ask
Options Select Option “Use the new PPD(Postscript Printing
Description” as is then apply.
8.The Printer worked successfully.
Thursday, August 30, 2012
ISSUE-Windows XP recovery after the BOSS 4.1 installation is not able to proceed or Partition tables Corrupted
ISSUE
When installing BOSS 4.1 in the system have already loaded of with windows xp, installation crossed the partition of disk space successfully.but in the middle the installation cannot proceed and stalled.Then we abort the cancellation of BOSS 4.1.but it not booting windows.
Solution:
I came to know that the partitions tables are corrupted so that windows cannot be bootable. also the active partition also changed.so following steps to recover from the issue
1.Load the DVD ROM with window xp cd and boot with windows xp installation.
2.Windows loading all files and ask for fresh installation(F8) or repair(R)
then select the following option
R to repair
3.Then load the command prompt type the following
DISKPART
it shows the partition table and the drives available.
4.Delete the partitions those created during the BOSS 4.1 installation.
5.Then restart the system and boot with BOSS 4.1 Live DVD
6.Go to System -> administration -> gparted.
7.Then change boot flag to windows xp installed partition.
8.Then window xp was loaded successfully.
Thursday, August 16, 2012
drm object :radeon continuously shows the errors in IBM Lenovo with AMD processor BOSS 4.1
ISSUE :
In IBM Lenovo with AMD processor BOSS 4.1 was successfully installed .but the GUI based login window is not shown but the terminal login only allowed.
before it throws
drm object :radeon continuously shows the errors and leads to terminal login.
Solution:
1.Edit the /boot/grub/grub.cfg Comment the Kernel 2.6.39 using #
2. Edit the following line in the grub menu
linux /boot/vmlinuz-2.6.32-5-686 root=UUID=bd7740e5-2080-4db2-8e97-d36a26d55110 ro splash vga=791 quiet
to following
linux /boot/vmlinuz-2.6.32-5-686 root=UUID=bd7740e5-2080-4db2-8e97-d36a26d55110 ro quiet
3. Go to the /etc/modprobe.d/radeon-kms.conf and edit the following line
options radeon modeset=1
to following
options radeon modeset=0
4.Then restart the system
5.GUI based login window is opened successfully
Friday, July 27, 2012
SAMSUNG ML-2240 Printer Not Working-Solution in BOSS 4.1
When I tried to configure samsung printer ML 2240 in BOSS it doesnot configured successfully.
1.select samsung ML 2550 Driver
2.Choose the SpliX V.2.0.0 Version then click forwrd.
(OR)
Select PPD file option and Select Splix Verson 2.0.0 ml2550.ppd then click forward.
3.Printer Was Successfully Configured.
ML-2240(SAMSUNG ML 2550 SpliX V. 2.0.0 Driver ml2550.ppd)
1.select samsung ML 2550 Driver
2.Choose the SpliX V.2.0.0 Version then click forwrd.
(OR)
Select PPD file option and Select Splix Verson 2.0.0 ml2550.ppd then click forward.
3.Printer Was Successfully Configured.
ML-2240(SAMSUNG ML 2550 SpliX V. 2.0.0 Driver ml2550.ppd)
Thursday, May 31, 2012
Configuring Steps for Vodafone 3G Data Card on BOSS 4.1
1.Insert the 3G USB Stick Device to PC.
2.After the Device Detected run following command in terminal
wvdialconf
3.After modem was detected edit the /etc/wvdial.conf
gedit /etc/wvdial.conf
phone = *9***1#
username = vodafone
password = vodafone
4. Then issue following command at the terminal.
wvdial
5.Device Configured Successfully
Monday, January 16, 2012
Configuration Steps of HP 8300 SCANNER in BOSS 4.0
- Login as root user.
- Create a new folder as “scanner” on the desktop.
- Copy the hp8300v2.zip to the “scanner” folder.Download URL:
- Open the scanner folder, right click the hp8300v2.zip and choose Extract and select Extract Here.
- A Folder will be created as hp8300v2.
- Go to the console Mode.
- Type the command : cd /
- Type the command : tar -xvzf /root/Desktop/scanner/hp8300v2/hp8300.tgz
- Type the command : tar -xvzf /root/Desktop/scanner/hp8300v2/libsane.tgz
- Power on the Scanner.
- To check whether the scanner installed successfully by typing the command
scanimage
-L
- Edit the file /etc/sane.d/dll.conf by using the command
vi
/etc/sane.d/dll.conf
Press
“insert” key
Type
hp8300 (without # symbol) after the line #hp5400
To
Save the File : Press “ESC” key and then Press “Shift : wq”
- Reboot.
- To Scan the image : 1. Select K Menu -> Images -> Scanning -> kooka.
2.
Select K Menu -> Images -> Scanning -> xsane
Friday, January 6, 2012
Open Office Issue 2- Solve fraction Number is recognized as date or specified form defined by default
Issue:
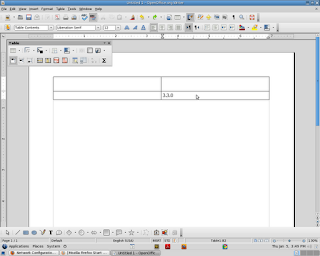
When typing in the table cell content as fraction like 3.3.0 it will automatically rendered as a date format.
Solution:
Steps follows
1.Type 3.3.0 in the table cell.
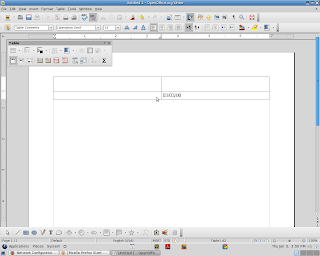
2.Then move the cursor in to another cell.it will automatically changes to the 03/03/00 .
3.Place Cursor in the any of the Table Cell.Then Right Click in the Table Cell.
4.It shows the options. The 'Number Recognition' is selected by default. Un select the option then you type 3.3.0 it will not change to date format.
Issue Solved
Subscribe to:
Posts (Atom)
JMeter JSON Extractor
json response {"Key1":"Value1","Key2":"Value2","Key2":"Value2"} Name of t...
-
This process will common for all HP Printers like HP LJ P 1007, P1020,P1020 plus,1022,3050 MFP, M 5035 MFP,P 2015N and Configuring the HP ...
-
Required Steps: HP Smart Install is a service running on firmware which You can det ect and disable Smart Inst all using t he 1. Usi...
-
List file=new ArrayList (); file.add("/home/selenium-workspace/starauto/starEE.xml"); file.add("/home/selenium-workspace...


