Evolution
Mail Client Configuration Manual
Step 1:
Open the Evolution Application
Applications → Internet → Evolution
Then Click 'Forward'
Step 2:
If you have already evolution mail
client backup file then select option 'Restore Evolution from the
backup file'
and choose
loaction of the file
otherwise
click the option 'Forward'
Step 3:
Record your
identity by entering your name and email address in the respective
fields.
Then
click 'Forward'.
Step 4:
For
reading and storing mail on IMAP Servers choose Server Type
is IMAP
For
reading and storing mail on POP Servers choose Server Type
is POP
configuration
option fill server
field imap.gmail.com
and username is
toaster.testing
If
the user want to use the secure connection
select the security option either TLS
or SSL
Authentication Type is by
default password
after
filling necessary fields click 'Forward'
Step 5:
In the receiving
options used for customize your settings to receive messages from
server.
User can choose
their own.
after
filling necessary fields click 'Forward'
Step 6:
To
Sending the mails to other recipients choose the Server
Type as SMTP
In
Server Configuration fill
smtp.gmail.com
choose
secure connection establishing using TLS
or SSL encryption
standard
In
Authentication type is PLAIN
username(email-id) of the user.
after
filling necessary fields click 'Forward'
Step 7:
Evolution Mail
Client have each mail address one configuration account.
That Describe or
identify the particular user account to view the messages .
Fill the Name
field like work or personal or the user wish.
After
filling necessary fields click 'Forward'
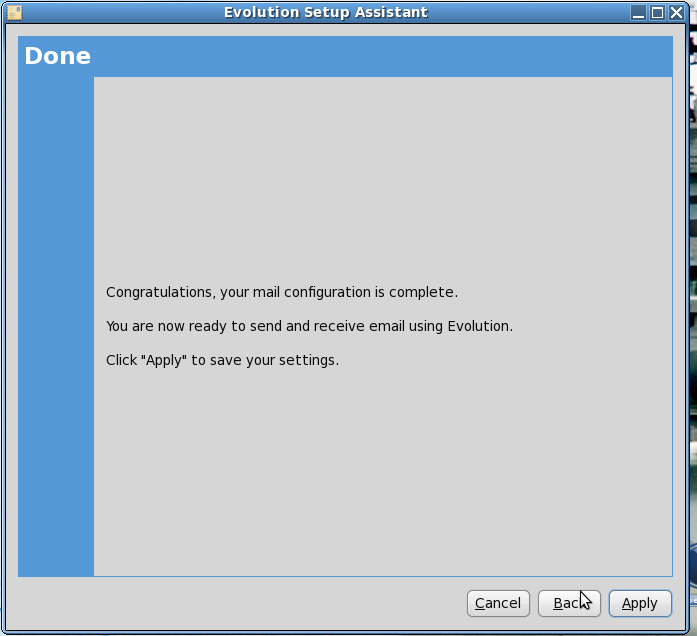
Step 8:
After
all the configuration settings done click 'Apply'
to save the settings and retrive the user mails from the mail server.
Screen Shots of Configured Mail
Address
Personal
is the currently configured account for toaster.testing
account. once click the personal account folders click Send
/Receive message option in the
tool bar.after clicking it will ask for password of toaster.testing
account .If the password is accepted it starts downloading messages
from the server.
In
Above Screenshot shows downloaded INBOX emails or messages
from the mail server
In
Above Screenshot shows downloaded ILUGC emails or messages
from the mail server
Sending
Mails
To
send a message or e-mail click new in the tool bar
(or)
message
→ compose new message(Shft+Ctrl+M
this
shown above screen shot
after
composing a new message it will go to outbox.
Now
Click Send / Receive
option in the menu bar to send the messages ,at the same any new
messages arrived in mail server also downloaded locally.
Above
screen shot shows the receipent received the mail.


