Wednesday, September 7, 2011

Evolution Mail Client Configuration


Evolution Mail Client Configuration Manual

Step 1:

Open the Evolution Application

Applications → Internet → Evolution


Then Click 'Forward'


Step 2:


If you have already evolution mail client backup file then select option 'Restore Evolution from the backup file'
and choose loaction of the file
otherwise click the option 'Forward'


Step 3:


Record your identity by entering your name and email address in the respective fields.


Then click 'Forward'.


Step 4:


For reading and storing mail on IMAP Servers choose Server Type is IMAP

For reading and storing mail on POP Servers choose Server Type is POP

configuration option fill server field imap.gmail.com and username is toaster.testing

If the user want to use the secure connection select the security option either TLS or SSL

Authentication Type is by default password

after filling necessary fields click 'Forward'


Step 5:


In the receiving options used for customize your settings to receive messages from server.

User can choose their own.

after filling necessary fields click 'Forward'


Step 6:


To Sending the mails to other recipients choose the Server Type as SMTP

In Server Configuration fill smtp.gmail.com

choose secure connection establishing using TLS or SSL encryption standard


In Authentication type is PLAIN username(email-id) of the user.

after filling necessary fields click 'Forward'


Step 7:


Evolution Mail Client have each mail address one configuration account.

That Describe or identify the particular user account to view the messages .

Fill the Name field like work or personal or the user wish.

After filling necessary fields click 'Forward'


Step 8:
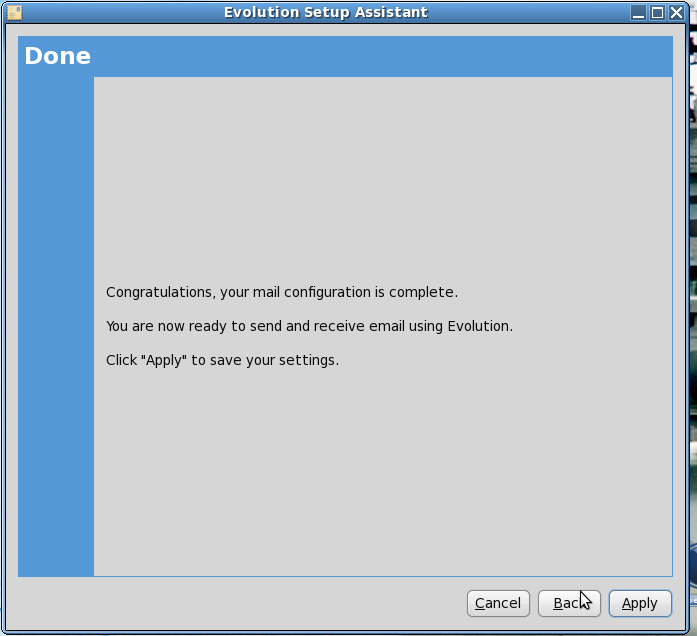

After all the configuration settings done click 'Apply' to save the settings and retrive the user mails from the mail server.


Screen Shots of Configured Mail Address

Personal is the currently configured account for toaster.testing account. once click the personal account folders click Send /Receive message option in the tool bar.after clicking it will ask for password of toaster.testing account .If the password is accepted it starts downloading messages from the server.


In Above Screenshot shows downloaded INBOX emails or messages from the mail server


In Above Screenshot shows downloaded ILUGC emails or messages from the mail server

Sending Mails


To send a message or e-mail click new in the tool bar
(or)
message → compose new message(Shft+Ctrl+M
this shown above screen shot

after composing a new message it will go to outbox.
Now Click Send / Receive option in the menu bar to send the messages ,at the same any new messages arrived in mail server also downloaded locally.


Above screen shot shows the receipent received the mail.

Thursday, July 14, 2011

Wubi Ubuntu Installer -Ubuntu Installed on Windows as like Application

Wubi installer available in Mac,Windows XP/Vista.

 for detail kindly visit this link https://wiki.ubuntu.com/WubiGuide

to download latest source code for wubi first install bazaar in your system

after installing type the following in your system

bzr branch lp:wubi

Thursday, June 23, 2011

GRUB 2 Recovery in Debian Linux

Grub 2 Recovery:-
Boot from live CD or DVD which support grub2.(BOSS 4 DVD or Ubuntu 9.10 CD
or above. DVD will take more time than CD thats why I suggest to boot from
CD).
Open terminal.Run fdisk -l to check the partition from which you want to
recover grub 2.
Here I assume that you want to recover it form /dev/sda1.
Then run the following commands:-
$sudo mkdir /media/sda1
$sudo mount /dev/sda1 /media/sda1
$sudo mount --bind /dev /media/sda1/dev
$sudo mount --bind /proc /media/sda1/proc

Then chroot into that partition by
$sudo chroot /media/sda1

Then re-install the grub by

#grub-install /dev/sda
The output should be like this:-
Installation finished. No error reported.

If you get error then try
#grub-install --recheck /dev/sda

After successful installation exit from chroot unmount the file systems you
mounted and reboot.
#exit
$sudo umount /media/sda1/proc
$sudo umount /media/sda1/dev
$sudo umount /media/sda1
$sudo reboot

Friday, June 17, 2011

Using SAMBA Sharing the Directory in a LAN (BOSS 4.0 GNU/Linux )

Global Parameters

[global] Anything in here applies to Samba as a global setting. There is some configuration info here that is important so that Samba and your Windows pc's will function properly. However some global settings can be overridden by share settings (more on this later). I will now go through each line and give a brief description of what role it plays in Samba.
workgroup = home: this is the name of your network group. It is important that both Samba and Windows are in the same workgroup. Please read your Windows documentation on how to change your Windows pc's workgroup name.
netbios name = Samba: netbios name is what you will see in your Windows pc "Network Neighborhood" for your Samba server.You can name this anything you wish. If you leave it blank, it will default to your host name.
encrypt passwords = yes: Samba can work with encrypted or unecrypted passwords. However, Windows 98, Windows NT, and Windows 2000 utilize encrypted passwords. The only time that this should be set to no is when you have any older Windows systems running on your network ie: Windows 95, Windows 3.x. If this is the case you will have to do some registery modifications to your Windows 98, NT, 2000 to allow them to send unencrypted passwords accross the network. Not the most secure situation though.


#global parameters
workgroup=home
netbios name=samba
encrypt passwords=yes

Share Parameters

[homes] When you create a user on your Linux pc (more on this later) it will automatically create a home folder for you in /home/yourusername. Think of this as your "My Documents" for Linux.
read only = no: By default Samba will always make any directory read only for security reasons, so we need to let Samba know that we want to be able to write to this directory.
browseable = no: defines when you map a network drive to Samba, it will map directly to your user directory ie: \\home\mw (this is my username on Linux and Samba) This share /homes/mw is browseable only by you. Remember this is much the same as the "My Documents" folder in Wndows
 
[share] This will create a share that is viewable, and writeable by anyone. This is not at all a secure share. Anyone can do whatever they wish, including deleting files that are not their own. I strongly do not recommend this type of sharing. I have given this example for illustrative reasons only.
path = /srv/samba/share: This tells us the directory is found on the Samba server as/srv/samba/share, and that when we will map the network drive it will be seen as "share" in Network Neighborhood
***To make this directory open a terminal window and type in md /srv/samba/share. Or this can be done from a file manager

read only = no: By default Samba will always make any directory read only for security reasons, so we need to let Samba know that we want to be able to write to this directory.
browesable = yes: This share will show in in Network Neighborhood as "share"

[rajendran]

same as share configuration

# Shared Parameters
[homes]
read only=no
browseable=yes

[share]
path=/srv/samba/share
browseable=yes
public=yes

[rajendran]
path=/srv/samba/rajendran
browseable=yes
public=yes

Adding Users and Restarting Samba

root@boss[~]#smbpasswd -a chamy
New SMB password:
Retype new SMB password:

restart the samba service

root@boss[~]#/etc/init.d/samba restart
Stopping Samba daemons: nmbd smbd.
Starting Samba daemons: nmbd smbd.


check whether samba is active or not

root@boss[~]#smbclient -L //samba -U chamy%chamy
Domain=[HOME] OS=[Unix] Server=[Samba 3.5.6]

    Sharename       Type      Comment
    ---------       ----      -------
    homes           Disk    
    share           Disk    
    IPC$            IPC       IPC Service (Samba 3.5.6)
    chamy           Disk      Home directory of chamy
Domain=[HOME] OS=[Unix] Server=[Samba 3.5.6]

    Server               Comment
    ---------            -------
    SAMBA                Samba 3.5.6

    Workgroup            Master
    ---------            -------
    HOME                 SAMBA

Now the directory specified on the smb.conf are shares across the network

This is worked for me.

Thursday, June 16, 2011

Using NFS Sharing the Directory in a LAN

NFSv4 server

Install the required packages...
  • # apt-get install nfs-kernel-server 
NFSv4 exports exist in a single pseudo filesystem, where the real directories are mounted with the --bind option.
  • to export directories in /home/users. First create the export filesystem:
    # mkdir -p /export/users 
    and mount the /home/chamy directory with:
    # mount --bind /home/chamy /export/users
    To save retyping this after every reboot add the following
    line to /etc/fstab
    /home/users    /export/users   none    bind  0  0
There are three configuration files that relate to an NFSv4 server:
/etc/default/nfs-kernel-server
/etc/default/nfs-common
/etc/exports
  • In configuration file /etc/default/nfs-kernel-server set following:
    NEED_SVCGSSD=no # no is default
    because NFSv4 security is not activated this time.
    In /etc/default/nfs-common set:
    NEED_IDMAPD=yes
    NEED_GSSD=no # no is default
    because UID/GUID to be mapped from names.
In order for the ID names to be automatically mapped, both the client and server require the /etc/idmapd.conf file to have the same contents with the correct domain names. Furthermore, this file should have the following lines in the Mapping section:
  • [Mapping]
    
    Nobody-User = nobody
    Nobody-Group = nogroup
    However, the client may have different requirements for the Nobody-User and Nobody-Group. For example on RedHatvariants, it's nfsnobody for both. Cat /etc/passwd and cat /etc/group should show the "nobody" accounts.
This way, server and client do not need the users to share same UID/GUID. 
For those who use LDAP-based authentication, add the following lines to user client's idmapd.conf:
[Translation]

Method = nsswitch
This will cause idmapd to know to look at nsswitch.conf to determine where it should look for credential information (and if LDAP authentication already working, nsswitch shouldn't require further explanation).
  • To export our directories to a local network 192.168.1.0/24
    add the following two lines to /etc/exports
    /export       192.168.1.0/24(rw,fsid=0,insecure,no_subtree_check,async)
    /export/users 192.168.1.0/24(rw,nohide,insecure,no_subtree_check,async)
Now restart the service
  • # /etc/init.d/nfs-kernel-server restart

NFSv4 client

Install the required packages...
  • # apt-get install nfs-common 
The client needs the same changes to /etc/default/nfs-common to connect to an NFSv4 server.
  • In /etc/default/nfs-common set:
    NEED_IDMAPD=yes
    NEED_GSSD=no # no is default
    because UID/GUID to be mapped from names. This way, server and client do not need the users to share same UID/GUID. Remember that mount/fstab defaults to NFSv3, so "mount -t nfs4" is necessary to make this work.
On the client we can mount the complete export tree with one command:
  • # mount -t nfs4 -o proto=tcp,port=2049 nfs-server:/ /mnt
    Note that nfs-server:/export is not necessary in NFSv4, as it is in NFSv3. The root export :/defaults to export withfsid=0.
It can fail sometimes with the message
mount.nfs4: No such device
To load the nfs module by giving the command
# modprobe nfs
mount an exported subtree with:
  • # mount -t nfs4 -o proto=tcp,port=2049 nfs-server:/users /home/chamy07/users
To save us from retyping this after every reboot we add the following line to /etc/fstab:
  • nfs-server or ipaddress:/   /mnt   nfs4    _netdev,auto  0  0
    The auto option mounts on startup and the _netdev option waits until system network devices are loaded. However this will not work withWiFi as WiFi is set up at the user level (after login) not at system startup. If user use _netdev with WiFi the boot process will pause waiting for the server to become available.
Note that _netdev only works with nfs version 3 and before. nfs4 ignores this option. Depending on how fast the network comes up on boot the mount entry may fail and the system will just keep booting. It can still be useful if user make own script to wait for the network to come up and then mount -a -O _netdev
Server doesn't come with any init.d/netfs or other scripts to do this for user.

Tuesday, June 7, 2011

Getting lines from the matching Line in BOSS GNU/Linux

To get the lines after from matching line use following pattern

input-text | grep -A NUM pattern-to-match

NUM is specify the number lines to printed or taken from input text

for example:

sudo ausearch -f / |grep -A 4 "Jun  8"

2:
To get the lines before from matching line use following pattern

input-text | grep -B NUM pattern-to-match

NUM is specify the number lines to printed or taken from input text

for example:

sudo ausearch -f / |grep -B 4 "Jun  8"

Wednesday, March 9, 2011

Grub Update

Already BOSS Linux OS installed in a partion in your hard disk and the entry is not updated inyour grub menu do the following

go to the directory called /etc/grub.d/


select the file name otheros  script file

edit the menu entry according to your where the os image is installed and initrd details in that.


menuentry "BOSS GNU/Linux, with Linux 2.6.32-3-486 (on /dev/sda9)" {
set root=(hd0,msdos9)
search --no-floppy --fs-uuid --set 9ad508a7-678a-4c92-b229-3b77de46dcd8
linux /boot/vmlinuz-2.6.32-5-686 root=/dev/sda9 ro pci=nommconf iommu=calgary vga=791 quiet
initrd /boot/initrd.img-2.6.32-5-686
}

after almodifications are over run type the following in terminal to exexute

update-grub2


now the grub will be updated

Now reboot the system.Missed entry will appear in boot menu

How to interact with the non-interactable Web Elements in Selenium

How to interact with the non-interact able Web Elements in Selenium    // Find the non-interactable element element WebElement element = dr...