Monday, December 23, 2013

Intel LM 217 Ethernet card Not Working in Boss Linux 5.0


1.Download the driver from intel website using the URL following

    http://downloadmirror.intel.com/15817/eng/e1000e-2.5.4.tar.gz


 Untar/unzip the archive, where is the version number for the
  driver tar file.

   tar zxf e1000e-.tar.gz

2. Change to the driver src directory, where is the version number
   for the driver tar:
   cd e1000e-/src/
3. Compile the driver module:
   # make install

   The binary will be installed as:
  /lib/modules/3.2.0-4-686-pae/kernel/drivers/net/ethernet/intel/e1000e/

   The install location listed above is the default location. This may differ
   for various Linux distributions.

5. Load the module using the modprobe command:
   modprobe e1000e

   With 2.6 based kernels also make sure that older e1000e drivers are removed
   from the kernel, before loading the new module:
   rmmod e1000e; modprobe e1000e
6. Assign an IP address to the interface by entering the following, where x
   is the interface number:
   ifconfig eth
7. Verify that the interface works. Enter the following, where IP_address
   is the IP address for another machine on the same subnet as the interface
   that is being tested:
   ping

Tuesday, December 10, 2013

How to install flash player in boss linux

follow the steps given below

1) if your system have internet connection type following command in gnome terminal

        sudo apt-get install flashplugin-nonfree

2)If you don't have internet connection download the flash plugin from adobe website link below

                     http://get.adobe.com/flashplayer/

then

 Copy the libflashplayer.so file into the following directory /usr/lib/mozilla/plugins/

for example if the file in /home//home/elcot/Downloads directory command should be like this below

sudo cp /home//home/elcot/Downloads/
libflashplayer.so  /usr/lib/mozilla/plugins/
Now the issue will be solved.

Thursday, November 28, 2013

Lexmark Scanner Configuration BOSS


Step:1

In order to take the scanning of a document across the LAN

open the web browser iceweasel, then type the IP Address of the Shared Network MFP (Lexmark) connected .

Example:192.168.42.7


Step2


Now Click “Scan profile” option in middle left side of Opened Page.

Then Click “Create Scan Profile” Dynamically for the current user logged in system in the LAN.


Step3


Now it pop a window to configure the profile for currently logged in to the user.

But the window shows an message “your browser does not have java support”.

To Solve this issue install “sun-java6-plugins” package to support java.


Step :4


Login as a administrator user at terminal or use “sudo package_name” install the package or synaptic manager to install the package from BOSS Repository.

apt-get install sun-java6-plugins

sudo apt-get install sun-java6-plugins


step5


Installation is progressing


Step :6


Click “OK” to continue the installation.


Step:7


Click “Yes” to continue the installation.


Step:8


“sun-java6-plugins”Package was installed in the system and iceweasel is asking to restart the browser.


step:9


To Confirm the application to run on the BOSS Click on the option “Run”.


step:10


select the custom settings for particular by choosing different options like default content ,darkness, Color, Resolution options and Page Options ,Advanced Options, ..etc.


Step:11


Click “Browse” Choose a location to save the scanned file in the local system
or
leaving the option to default it will stored on “/home/boss/image.pdf”
user name is “boss”
You must give Scan Name or Profile Name for particular user to identify the profile across the network


step:12


The Profile is created successfully and ready to receive the scanned document from the Lexmark Scanner.


Step:13


When Scanning how much size is recevied form scanner device.

To See the Scanned Document on the local system Click “Launch” option.


Wednesday, November 20, 2013

Reliance Netconnect Configuration in BOSS linux

1.Insert the Reliance 3G USB Stick Device to PC.

2.After the Device Detected run following command in terminal

        wvdialconf

3.After modem was detected edit the /etc/wvdial.conf

        gedit /etc/wvdial.conf

          phone = #777
          username = 9380766444
          password = 9380766444

4. Then issue following command at the terminal.

    wvdial

5.Device Configured Successfully

View Power Software Installation On BOSS Linux


1.open the terminal and change the PS1 variable to ">" like following

  export PS1=">"


2.Now run the setup file for view power software by terminal
 ./installViewPower

3.It shows graphical installation menu and the sofware was successfully installed.


Tuesday, August 20, 2013

Move Taskbar in BOSS 5.0 GNU/Linux


1.Press Alt key at the same time Right Click in the Mouse shows the small window

In that Click “properties” -> Orientation -> Bottom

2.Then it select the taskbar to bottom shown below screen shots explains the actions


Tuesday, June 11, 2013

How to Copy the Virtual Machine contents to the host system in BOSS Linux

1.First open the places ->  connect to server option

2.Then type the IP Address of the host system and give user login credentials.

3.Login details correct then it connected to the host system.It shows the users directories and files.

4.Now paste the copied contents from virtual machine.

5.Now you have copied the contents from virtual machine.

Thursday, April 18, 2013

Virtual Box Installation at BOSS 5.0 Linux


1.To install the virtual box

apt-get install virtualbox

2.To enable USB storage device  install the following in BOSS

apt-get install virtualbox-guest-additions virtualbox-guest-additions-iso

3.Restart the system.

Monday, February 11, 2013

Installing Message Passing Interface Compiler in BOSS Linux

1.To install mpicc compiler


sudo apt-get install mpi-default-dev


2.To run MPI program

apt-get install mpi-default-bin


How add or Setup a Bluetooth Device in BOSS 5.0 or Solve Issue or Error in Bluetooth Device adding to BOSS


1.Click the bluetooth Icon in the upper right task bar in BOSS 5.0.


2.Click setup device option for adding new bluetooth device to the BOSS installed system.


3.Then the system for new devices enabled with bluetooth. Search give the founded devices list.

choose any one the device before communicate with it to pair with device.


4.Select the device "Chamy" then it shows the number code to be entered by the bluetooth device going to be add and pair with the system.


5.Enter the numeric code from the bluetooth device then it will paired with system and it is ready send /receive files from both devices.


6.To Send the files to the connected bluetooth device click the bluetooth icon andselect the paired device "chamy" this will show options to send files.


7. then select files to send


 8.file transfer progress.


9.Added device shown in the Desktop.


How to install DropBox in BOSS 5.0 Linux

1.Install python-gpgme package.issue following command in terminal.

          sudo apt-get install python-gpgme

2.install the dropbox package from BOSS 5.0 Anoka repository by issuing following command

          sudo apt-get install nautilus-dropbox

3.To Start dropbox go to Internet -> dropbox  and  Click to continue to use the dropbox.

4.Otherwise issue the following command to start in the terminal


          dropbox start -i

5.The Dropbox daemon works fine on all 32-bit and 64-bit Linux servers. To install, run the following command in your Linux terminal.


32-bit:

cd ~ && wget -O - "https://www.dropbox.com/download?plat=lnx.x86"|tar xzf -
 
64-bit:

cd ~ && wget -O - "https://www.dropbox.com/download?plat=lnx.x86_64"|tar xzf -
 
Next, run the Dropbox daemon from the newly created .dropbox-dist folder.

~/.dropbox-dist/dropboxd
 
If you are running Dropbox on your server for the first time, you will be asked to copy and paste a link in a working browser to create a new account or add your server to an existing account. Once you do, your Dropbox folder will be created in your home directory. Download this CLI script to control Dropbox from the command line. For easy access, put a symlink to the script anywhere in your PATH.

6.Now the dropbox successfully configured in BOSS.

Wednesday, February 6, 2013

Printer Configuration or Adding Printer in BOSS 5.0


 1.Go to Applications -> system tools -> printing


 2.Click the add option in the menu.


 3.If locally connected printer it will automatically show connected printers list.


if network printer choose appropriate option in the HP Jet Direct for adding HP Network printer and enter the IP Address


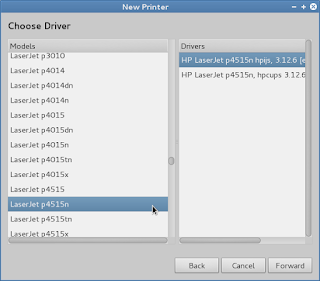
4.choose the printer driver from the printer database


5.If the printer driver file(PPD) directly downloaded from the manufacturer website then choose the option provide PPD file.


 6. choose the printer model to add the printer driver


 7. Describe the printer location and human readable identification of the printer.


 8.Successfully added printer.


Linux Kernel Compilation

 Step 1: Install Required Packages Install additional packages before building a kernel. To do so, run this command: sudo apt-get install gi...